
I shouldn’t complain because many cities prohibit having any type of cooker on high-rise patios, but here in Chicago, those of us who live in Condos and apartments are limited to gas grills. No charcoal allowed, no pellets, no dedicated smokers, and most upsettingly, no Big Green Eggs.
Still, since many city-dwelling folk dream of becoming the next Aaron’s Franklin, we have to work with the cards we’ve been dealt; and that means woods chips and smoker boxes. The same applies for people who just don’t want to invest in anything more than their basic gas grill.
Acceptance.
Unlike professional pitmasters, using chips and a gas grill means that you are going to be forced to watch your temperature much more closely. Chips take about 25 minutes to start smoking and burn for roughly 35 to 40 minutes. The last thing you want to do is have periods of time where you don’t have any smoke contact with your meat during the cooking process, so staying on top of your fire is extra important.
The next thing you need to accept is your limits. Sausage, turkey breasts, ribs, and chicken normally need three to five hours and make for an awesome outdoor afternoon of beer and cooking. They also typically require a cooking temperature of 265° to 275° which is manageable. However, the king of bbq meats, brisket, is just something that you may or may not want to leave out of your repertoire. I say this because of the time and temperature it takes. 10-pound plus Briskets need 15 hours or more of smoking and since you need to be replacing chips every 35 to 40 minutes, some may find it too daunting of a task. Pitmasters also cook brisket at very low temperatures so making sure your grill is not in the direct sun, or that you are not making the attempt during the hottest day of the year will be important factors.
Finally, the last thing you must accept is that smoking will not be possible on any grill with less than three burners. 2-burner grills are a popular option for people who live in condos and apartments since it is compact and does not command a significant investment, however any way you arrange the food, it will be too close to the lit burner and will dry it out over the long cook period.
The Smoker Box.
There are three types of smoker boxes that you can use on your gas grill.
-
Built in.
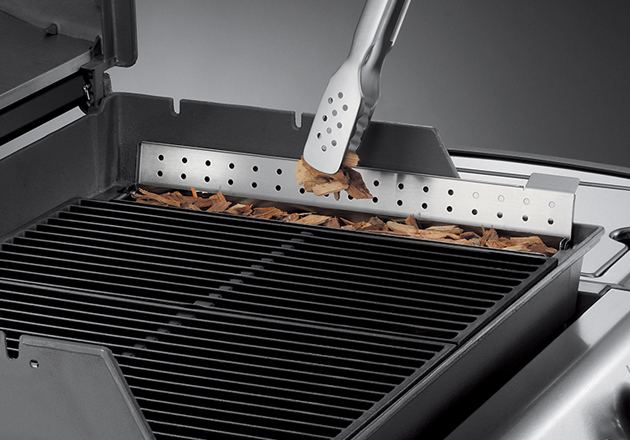 Brands like Weber usually have built in smoker boxes that come by default with their highest-end grills. However, brands often also sell smoker box attachments separately that you can add to their mid-range models. These will come not only with the box, but also an additional narrower grate to allow you to maximize your cooking surface after fitting the smoker box in.
Since I have the Weber Genesis, this is the option I personally went with after a year of working with the second type of Smoker Box. This option was $125.00 but can sometimes be found online for less.
2. Stainless Steel Smoker Box.
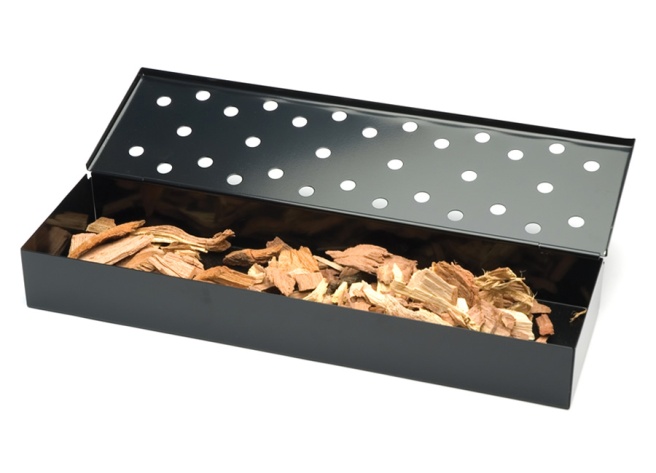
Smoker boxes are the most common unit that people use to smoke meats on their gas grill. They are usually rectangular in shape with perforations on the top and bottom to allow the grill fire to hit the wood, and conversely the smoke to hit your food.
Though cheaper, the downside is that you will lose 50% of your cooking surface as you are required to remove one of your grates and place the box right on top of the flavorizer bars. Also, for longer smoking times, I recommended purchasing two boxes so that you can constantly rotate filling them with new chips as to avoid periods of time without any smoke at all. Basically, as one box begins smoking, its time to fill the other with new wet chips. As the first box burns out, the second one will start going.
Smoker Boxes are generally $15.00 to $25.00.
3. DIY Smoker Boxes

The third way you can add some smoky flavor to your meats is by creating your own makeshift Smoker Box. Basically, you put soaked wood chips into a disposable aluminum pan, cover with tin foil and poke some holes in the top.
The option is good for short cooks that don’t require much smoke as seen in this (amazing) recipe here. However, since you can’t refill the pan will more chips once they burn out, you are very limited. At the same time, this method should only cost you a buck or less.
The Wood Chips.
Avoid using mesquite altogether
At any Home Depot, you can find Mesquite, Hickory, Apple, Cherry, and Pecan wood chips for roughly $6.00 a bag. However, don’t be shy to look up an independent bbq specialty retailer in your area who sells Oak. In addition to the wood, these guys will be more than happy to give you advice on the cook and everything about bbq and grilling in general. You can also refer to Amazon as well for chips too.
In general, my personal position is to avoid using mesquite altogether. It is the heaviest of the woods and is really only appropriate for certain brisket recipes, which I already mentioned to avoid cooking on a gas grill. For good resource, try sticking to the following chart.
OAK: Everything
HICKORY: Everything
APPLE: Poultry and Fish
CHERRY: FISH
PECAN: Poultry and Fish
Once you get comfortable smoking food, you can also create combinations of different wood chips to bring out unique flavors. 70/30 apple and hickory is my personal preference for hot-smoking salmon.
No matter which wood chips you choose, be sure to soak them in a bowl of water for at least 30 minutes before putting them on the grill. If you don’t, the wood will quick flash and burn off too quickly to give your food any real smoke flavor.
The Cook.
When starting the grill, only turn on either the far left or right burner. For fear of sounding trite, when using a built-in smoker box, be sure to light the burner next to it. For separate or makeshift smoker boxes, you will want to remove one of the grates on either side of the grill, place the box directly on the flavorizer bar and ignite the burner under it. You can turn the burner up high initially to get your wood smoking quicker, but you will want to turn it down before putting any food on the cook surface. It generally takes about 25 minutes for the initial chips to begin smoking.
WATER PAN. Not all recipes require it, but it can never hurt and will help prevent your meat from drying out. You can use a stainless steel cup, or another small aluminum pan and fill it with water. try placing right against the back wall of your grill to the maximize cooking surface for your actual food.
Once the smoke is noticeably escaping the grill even with the lid closed, you can then adjust the temperature down on the burner to the 265° to 275° range depending on your recipe.
The saying, “when you’re looking, you’re not cooking” is true but unfortunately, since you will need to replace your chips roughly every 40 minutes or so, try to do it as quickly as possible each time in order to maximize the smoke contact with your food. Managing the temperature will require you to keep moving the burner knob up and down periodically. You don’t have to sit there the entire time, but just be sure to keep a watchful eye every 30 minutes or so.
Final Thoughts.
The last piece of advice I have is to cut 10 to15 minutes of time off of the recipe when smoking on a gas grill (except in the dead of winter). Although you would think to do the opposite and increase the smoke contact in this less than ideal environment, the truth is that your temperature control in nowhere near the same level of accuracy as a person with a real smoker. Because of this, I think its best to play is safe and remove the meat a bit early. You can always use a thermometer to make sure the food is cooked to the appropriate temperature too. Also, move your grill out of the sun for optimum temperature control.
RECAP
- Soak chips for 30 minutes
- Put water pan on the grill.
- Put smoker box full of the chips directly on the flavorizer bars and light the burner under it
- Get the temperature to 265° or 275° before adding meat
- Drink beer
- Enjoy!
